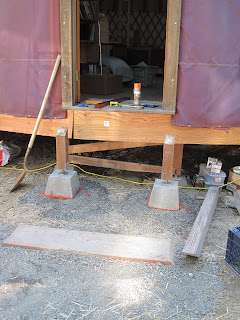
This was good enough, allowing us to focus our energy on more urgent items. Once those were out of the way, this became #1, so we set to work on it.
We've been thinking about a deck that ties the yurt to the RV and the other structures we have planned. We've also thought about adding a catwalk around the perimeter of the yurt. Doing all that right now wasn't the right choice - we have other tasks we'd like to get to soon. Could we do temporary steps now, and then make things all fancy later on?
I asked on DIY Stackexchange, and found out there's such a thing a pre-cut stringers. We hit the Home Depot on a trip to Port Angeles. They had treated stringers only, in 2- and 5-tread varieties. I wanted to use untreated wood if possible, because these aren't intended to be permanent anyway, and the world doesn't need more stuff that can't rot.
I ended up buying Simpson Strong-Tie TA9Z Staircase Angles. Instead of cutting stringers, you screw these in to sides of the stringers, and place the steps on top.
For stringer material, we ended up using left-over 4" x 6" beams that were left over from the yurt. (At the previous site, some of the joists were untreated, and I replaced them with treated wood, so I have a bit of untreated 4x6 sitting around.)
It turns out people are pretty sensitive to stairs. If a step isn't level, you can feel it. If the spacing between the steps isn't consistent, you can trip. If the spacing isn't what feet expect, it can feel awkward.
I'm told that ideal steps have a 7" rise. The doorstep is 32" above grade. 32" / 7" = 4.5 steps. But you can't have 1/2 a step, so you round. 5 steps would give 6.4" rise, while 4 steps would give 8" rise. As rise decreases, run should increase to keep things comfortable. The 5 step flight would require a total run around 60", while a 4 step flight only needs a 44" total run. 4 steps is less work, less material, less space, and 8" is nice and round. 4 steps it is.
For width, I've read that 2-by treads can't be longer than 36" if they're only supported on the ends. Since our treads are untreated, I wanted to be careful about not overloading them. Our door is only 34". We chose 35" treads, giving a little wiggle room coming out of the door while being slightly stronger than 36" treads.
For the first tread, we embedded a piece of treated 2x12 we had sitting around. This was originally for use under Coach's tires for leveling, but our parking spot has been leveled out since then. Since it would have direct ground contact, treated seemed like a good choice here.
Attaching the top of the steps to the yurt would be tricky, since the joists are under the platform, and don't come all the way to the edge. But we did have some extra pier blocks which would do the trick.
We modeled the steps in Google Sketchup. This was particularly useful to figure out the angle to cut the tops of the posts. The Google Sketchup model told us that our 8:11 slope was 36 degrees. I assume trig was involved, but I didn't have to do any of it. My 4' level has can give a measurement within a few degrees.
We have a pile of 3/4"-minus crushed rock that is slowly getting smaller. In this case, we used some to level under the bottom tread and under the pier blocks.
To get each step in exactly the right place:
- Attach one tread bracket to the left side of the tread.
- Set a carpenter's square on the first step, on the right side.
- Measure 8" up. This is the top of the step. Draw a line.
- Come down 1.5" (true thickness of the tread). Draw a line.
- Measure 11" back from the step below. Draw a line.
- Place a tread bracket according to the lines, and secure it with one screw.
- Flip the bracket over.
- Attach the tread to the bracket.
- Flip it back over.
- Gently clamp the left bracket in place.
- Level the tread front-to-back. Secure the right bracket to the stringer. Now the tread can't rotate.
- Measure 11" back on the left side.
- Level the tread left-to-right. Secure the left bracket to the stringer.
- Repeat.
I missed the step about measuring back 11" on the left side, but they all turned out within 1/2" anyway, so it's good enough.
My first step turned out 1/2" low. I can't explain why.
The kids loved the result.


