Saturday, February 27, 2010

An attempt at a footing

I was reading about footings and foundation walls, and tried to imagine how those might look in this house.

The purpose of a footing is to distribute the weight of the house so that it doesn't sink in to the ground ("settling"). Settling causes cracks in foundations, in drywall especially around openings, and doors that stick.

I would like this house to last for a long, long time, so getting the footing right is important.

A rule of thumb I've often read is to make the thickness of the footing equal to the width of the wall, and twice as   wide at is it thick.  A common insulated cordwood wall thickness is 16" (4" mortar, 8" insulation, 4" mortar). In Manitoba they build cordwood walls at 24" thick (4" mortar on either side, and 16" insulation, wow!). I want an energy-efficient house, but I need to balance that against how much wood I have, how heavy the cordwood logs will be, how much concrete goes in to the foundation, how much excavation the footing requires, and the fact that wall thickness is included in the official square footage for tax purposes. (Stupid, why charge people for good insulation? It incentivizes the wrong behavior.)  A 16" cordwood wall is about R-20, which is a common code requirement (although a well-built 16" cordwood wall will far outperform an R-20 conventional studded wall, because the studs transmit heat but are typically ignored in the calculations.)

Anyway...

A 16" x 32" footing, over the perimeter of a 40' x 40' structure requires about 21 (cubic) yards of concrete. At $75/yd, it's $1600.  That's just for the concrete, not for excavating or installing forms or anything else.  I plan to have a concrete slab subfloor, as well.  If you assume 4" thick, that's another 20 yards, or $1500 more. It's adding up, and we're not off the ground.

I like the slab for its high thermal mass for solar gain and comfort. It's also good for radiant floor heat, which is supposed to be very comfortable. I also don't have to build a crawlspace, so it keeps things simpler.  (Unfortunately, the systems you might put in a crawlspace, like waste plumbing, have to be built in to the slab, so that's a bit of work.)

If I'm going to all the trouble of pouring 21 yards of concrete in a footing, I'd like to take advantage of it for thermal mass. That means insulating the outside of the footing. I'll actually put Dow Styrofoam Blueboard panels down before pouring the footings.

In many places, the footings need to be deep, to protect against frost heaves. (As the ground freezes, it can move houses; it's very powerful.) I don't know what the frost depth is here, but it can't be much. It just doesn't get that cold, and not for very long. Still, a 16" thick footing will start off 16" below the frost long, so we're off to a good start. If the frost line is lower, I'll have to adjust.

Conventional thinking is that cordwood should start a foot or so above the ground. Codes often require 8" between grade and wood. The idea is that rain can splash up and invite rot. I could just pour a concrete wall there, but it's not that simple. I need a layer of insulation splitting that wall, and separating one side of it from the foundation.

One option is to use concrete blocks, which are 8" x 8" x 16" after 3/8" of mortar. (You can skip the mortar, and use surface-bonding compound, which is stronger and simpler for the novice, but the math is harder so I went with mortar.) I drew 3 courses of blocks, getting us 2' above the footing. I could go with 2' if I make the outside of the footing flush with the exterior wall, but in this drawing I filled in over the footing. Hmm...

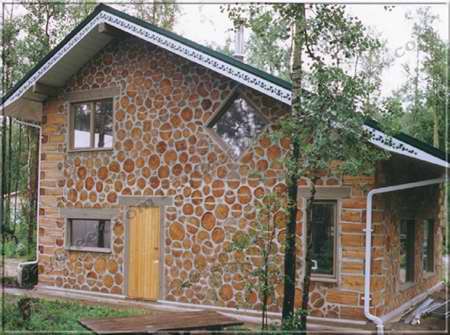
To make the lower exterior wall more pretty, I drew stone masonry. When I first started thinking about house building, I read a lot about slipform stone masonry. It's absolutely gorgeous, and you can use found stones instead of paying for siding or whatever. But there are some issues: how to the the thermal mass on the inside of the insulation without building two walls? How to attach things to the walls on the inside? Could we find a sufficient supply of beautiful rocks in this area, where it's mostly glacial till?  But those issues are all resolved in this design, so I went ahead and included an 18" course of stone masonry on the exterior.

I could replace the interior concrete block with stone masonry as well.  Or I could use concrete block inside and out, for simplicity, if I make the wall 18" instead of 16" (8" blocks + 2" blueboard insulation).

In this drawing I know I ignored are drains to remove water from under the slab and around the footing. I don't know if they're required around here, but they seem like a good idea.

I also ignored the vapor barrier. It's so thin that modeling it seemed like more trouble than it was worth. Still, getting it right is non-trivial, so I'll have to think about it more later.

Doing this drawing was a good exercise. It forced me to answer some questions that I hadn't hit before, because some ideas are impossible to draw.

Monday, February 15, 2010

A rough floor plan

Here's a floor plan that I've been working on. It's far from finished, but it's useful as basis for discussion.

Construction notes:
  • Load is carried by large timbers (not drawn)
  • Exterior walls are cordwood.
  • Interior walls are conventional drywall over 2x4 studs
  • The big wall north of the kitchens and bathrooms is 2x6 studded and insulated.
  • Floor is poured concrete slab with embedded radiant heat tubing
  • Slab and footings fully insulated
  • Floor covering is homemade earthen terra tiles
  • Garage is insulated and floor has unconnected radiant heat tubing, for later use
  • South wall is full of windows

Features:

  • Simple shape for cheaper roof
  • High insulation, thermal mass, and south-facing windows for energy efficiency
  • Under 1250 sq. ft. heated space, so codes will allow a large dwelling on the same property
  • Noise of washer and dryer contained in garage.
  • Attached garage contains holds functions that would normally be in heated space, making the heated space smaller.
  • Open floor plan brings family together.
  • Adults separated from kids at night.
  • Door to garage is a functional entrance for the family.
  • Short trip from garage to kitchen (for groceries).
  • All plumbing is in one wall, easing construction and maintenance and keeping distance from hot water heater to kitchen short.

Issues:

  • Kitchen is vague
  • Not sure where front door should go.
  • Not sure where sofa belongs
  • No transition from public to private spaces
  • Large fireplace would break the open space and block light to kitchen.
  • Hot water to shower is not a short path.
The floor plan is drawn in Google SketchUp. If you're interested in taking a closer look, click on the image above.

Saturday, February 13, 2010

More wires! I need more wires!

Cordwood construction makes exterior walls that are hard to change. A sledgehammer is required. Adding a new power circuit is tricky. My floor is also poured concrete, so no help there. I want to make sure to do what I can now so it's not a problem later.

I'm thinking of making putting a timber post every 8'. (Making plywood and drywall fit easily.) On one side of each post, I will run conduit with wire for power. On the other side of each post, conduit for low-voltage. In the middle of each panel, flex conduit left empty, for later expansion.


Code has power outlets every 12', so every 8' will be nice. And if that's ever too far, there's another spot just 4' away.  Goodbye extension cords.


I don't use ethernet now, except for short local runs. Wi-Fi is reliable enough and fast enough for me these days, and it keeps getting better. We don't watch cable TV. We don't use land lines. So the low-voltage may sit idle forever! But I know to build it anyway, because now it's easy and later it's hard.

I haven't though about interior wall wiring much. They're so much simpler to change that it's just not on my radar yet. I'll get to it at some point, though.

Pure Cordwood rejected

I was hoping to build the house with cordwood walls.  It has some of the beauty and low embodied energy of traditional log homes, but it's easier to build, better insulated, and way cheaper.  The walls look like a stack of firewood, with the ends visible.


The logs are held together with a matrix of mortar. The mortar doesn't go all the way through. It's 3" - 4" wide on each side, and in between is insulation, like sawdust.

The building department says this kind of construction isn't safe in this area, due to earthquakes. All the cordwood experts agree.  So now we've modified plans to do timber-framed construction with a corwood infill.


Hopefully we can use the wood we cut from our own property, but it will take a while to season. Also, there may be issues with grading the wood.  We'll see.

The trouble with insulation

It seems obvious at first that insulating a house well is a good idea.  As my brother put it, "It's a passive heating element. You do it once and you don't have to spend time or money on it again, unlike active heating."

Insulation is great. However, it's pretty hard to insulate well enough that no fuel heat is needed (in cold climates).  Let's take a closer look:

We measure insulation in R-value, typically per inch of thickness of a material. The exact unit is sq. ft. * degF delta / BTU.  

Concrete is R-0.08.  Softwood varies, but is around R-1.4. Fiberglass batts (what the pink panther sells) is R-3.1.  That means that 38" of concrete is about as good an insulator as 1" of fiberglass batts. 

The unit is kinda backwards; what you really want to know is "how much heat will I lose through this wall?" not "how well does this wall hold back heat".  For example, a conventional studded wall with 2" x 6" studs, fiberglass batts, drywall, Tyvek, siding, and paint will have an R value around 20 (which is the code requirement for walls in a lot of places). Suppose you keep the indoors at 70 deg F, and outside it's 40 deg F.  If the wall is 8' tall and 40' long, then the total heat loss in the wall is:

    (70 - 40) * 8 * 40 / 20 = 480 BTUs lost per hour.

Imagine a 40' x 40' house with no windows or doros, and a flat roof, with all walls, roof, and floor insulated this way. Wall area is 8' * 40' * 4 (320 sq. ft.). Floor & ceiling are 40' x 40' each (3200 sq. ft.).  

    (70 - 40) * (320 + 3200) / 20 = 5280 BTUs lost per hour.

Most of our heating happens over a 5 month period here, which is 3600 hours. That's about 19 million BTUs.  A cord of firewood is 17 MBTUs. Electricity has about 3400 BTUs per kWh; at $0.10 / kWh that's $550 to heat the house through the winter. Sound good to me.

There are some "free" heat sources in the house, like cooking, body heat, and computers. Models I've seen count these for 8 degF.  (Maybe I should become a server hosting colo facility, for the free heat).

What about windows? Windows are about R-1 per pane (not per inch). That's way lower than the wall, so we should avoid windows, right? But this is a house for people, not dry goods, and people really like windows. 2-pane glass is pretty common, so R-2 for glazing is reasonable. There are some super-expensive R-11 windows, but they are xenon-filled, which leaks out over time, and they lose their insulation value. They also have coatings that reduce the amount of solar gain.

If you have a lot of windows, adding insulation to the walls won't help much: the heat isn't going out there anyway.  

You also lose a lot of heat through "air infiltration" aka "ventilation". We typically want the indoor air to circulate outside, carrying out toxins and bringing us oxygen. Old leaky houses (like the one I'm in now) replace the full volume of air about twice each hour. The tightest houses today only replace 1/3 of the air each hour, but they have to work hard to maintain air quality. For example, they may use an air-to-air heat exchanger so the outgoing air pre-warms the incoming air. I'm thinking about "earth tubes" - long PVC pipes that snake under the ground to pre-warm outside air on the way in. They're passive once built.  

Since windows and air replacement are the main sources of heat loss in a well-insulated home, adding more insulation doesn't get you much. Doubling wall/floor/ceiling insulation won't cut your heat bill in half.  I did a lot of spreadsheet modeling this stuff, and ended up with numbers like this:

1: Exterior wall heat loss (BTU / degF / hr) 23
2: Roof or ceiling loss 56
3: inviltration loss 166
4: heat lost through glass w/out insulation 150

Restricting windows also takes away the potential for free heat from the sun. Solar heat is tricky: it is most plentiful when it's least needed. Awnings and deciduous trees are good for moderating summer sun while allowing winter sun. Still, we need the heat at night more than during the day. A well-insulated house with lots of south-facing windows will definitely be hot on summer afternoons. All those windows will mean cold winter nights, too. Ack! The solution is thermal mass. It evens the heat out between day & night. My floor will be an insulated concrete slab w/ earthen tiles over, so lots of thermal mass and conductivity there.  The walls have a mortar matrix that provides more thermal mass.

Get enough thermal mass and you can even the heat out between winter and summer. We don't get enough summer heat to do that here, but it works in many places.

There are "active" solar heat systems that are pretty cool, but more complicated. One is to dig a deep pit under the house, insulate it, put a network of (internet?) tubes through it, and fill it with gravel.  In the summer, collect solar heat on the roof and pump it down to the bottom of the gravel. The heat will slowly move through the gravel, and arrive at the house in time for winter. The math on this is pretty easy.  It's a neat idea, but way too complicated & expensive for us.

You'll notice above that the surface area of the floor & ceiling are 10x the area of the walls. Roofs are also expensive.  That suggests a two-story building, which cuts the top & bottom surfaces in half while adding only a little to the wall area. 

However, there are some downsides: working up high in the air is harder, especially for us novices. The engineering of a two-story structure is more complex.  A little floor area is lost to the stairwell. Some facilities have to be duplicated between top & bottom floors, so you aren't always running up & down the stairs to pee, or to get a screwdriver.

Of course, two-story is nice in other ways, too. It provides a clear separate of public & private spaces. It's easier to put all the plumbing together, if one bathroom is on top of another.  Maybe for the next house.

Anywhere, where does all of that leave us?

- Smaller is cheaper & more efficient.

- Insulate walls well, but don't worry about it too much; most heat will go out the windows and vents.

- Caulk well, but make sure you still have fresh air.

- Use good windows. More panes are good.

- Put most of the window area on the south side of the house.

- Have enough thermal mass for the window area. More thermal mass is good, but don't break the bank.